3. 개선된 CI/CD
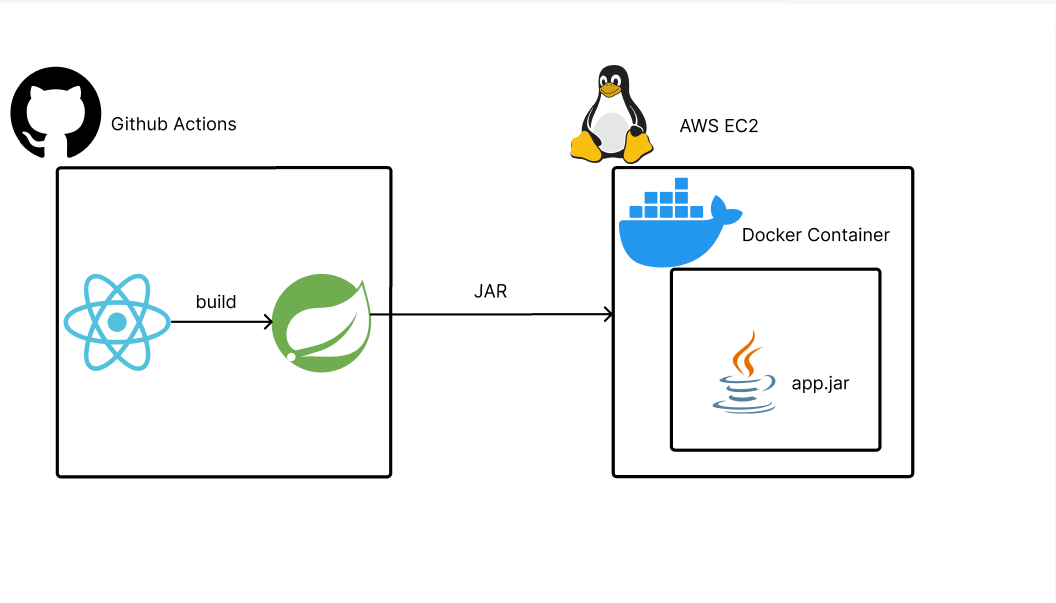
이 글에서는 ShopSphere 프로젝트의 CI/CD 자동화 구조를 개선한 과정을 설명합니다. 기존에는 EC2에서 모든 빌드 작업을 수행했지만, 리소스 제약과 관리 불편 때문에 GitHub Actions에서 빌드 → EC2는 실행만 담당하는 구조로 리팩토링했습니다.
전체 흐름 개요
기존 CI/CD 구조의 문제
기존 방식 모듈 구성
프론트엔드 빌드 모듈 (EC2 내부 실행)
cd ~/ShopSphere-Frontend
git pull
npm install
npm run build
정적 파일 백엔드 복사 모듈
rm -rf ~/ShopSphere-Backend/src/main/resources/static/*
cp -r build/* ~/ShopSphere-Backend/src/main/resources/static/
백엔드 빌드 및 실행 모듈 (EC2 내부 실행)
cd ~/ShopSphere-Backend
./gradlew bootJar -x test
sudo docker build --no-cache -t shopsphere-backend .
sudo docker run -d -p 8080:8080 shopsphere-backend
문제점 요약
- EC2에서 직접
npm run build,./gradlew bootJar를 실행 - EC2에 Node.js, Gradle 등 빌드 도구 설치 필요
- t2.micro에서 자주 메모리 부족 또는 빌드 실패
- 빌드 실패 시 디버깅 어려움
개선된 CI/CD 구조
개선 후 방식 모듈 구성
프론트엔드 빌드 모듈 (GitHub Actions 내부 실행)
- name: Build Frontend
  working-directory: frontend
  run: CI=false npm run build
정적 파일 백엔드 통합 모듈
- name: Copy Frontend build to Backend static folder
  run: |
    rm -rf backend/src/main/resources/static/*
    cp -r frontend/build/* backend/src/main/resources/static/
백엔드 빌드 모듈 (GitHub Actions 내부 실행)
- name: Build Backend with Gradle
  working-directory: backend
  run: ./gradlew bootJar -x test
JAR 파일 추출 및 전송 모듈
- name: Move final JAR to root
  run: mv backend/build/libs/*.jar app.jar

- name: Upload final JAR to EC2
  uses: appleboy/scp-action@v0.1.4
  with:
    source: app.jar
    target: ~/ShopSphere-Backend
EC2 실행 전용 모듈 (경량화된 실행 전용)
cd ~/ShopSphere-Backend
docker build --no-cache -t shopsphere-backend .
docker run -d -p 8080:8080 --name shopsphere-backend-app shopsphere-backend
변경 전과 후 비교표
| 항목 | 변경 전 (EC2 빌드) | 변경 후 (GitHub Actions 빌드) |
|---|---|---|
| 프론트 빌드 | EC2에서 실행 | GitHub Actions에서 실행 |
| 백엔드 빌드 | EC2에서 실행 | GitHub Actions에서 실행 |
| 빌드 도구 설치 | EC2에 Java, Node.js 필요 | EC2는 Docker만 필요 |
| 전송 파일 | 없음 | app.jar 하나만 전송 |
| 디버깅 편의성 | 낮음 | GitHub 로그로 추적 가능 |
마무리
이번 개선으로 ShopSphere 프로젝트의 CI/CD 구조는 훨씬 간결하고 효율적으로 바뀌었습니다. EC2는 실행만, GitHub는 빌드 전담이라는 분리가 명확해졌고, 프리티어 환경에서도 안정적으로 배포할 수 있는 구조가 완성되었습니다.